How to Install Aluminum Composite Panels: A Comprehensive Guide
Aluminum Composite Panels (ACP) have revolutionized modern construction due to their durability, versatility, and sleek aesthetic. Proper installation, however, is essential to ensure these panels deliver on their potential. This comprehensive guide will take you through each step of the process—from preparation to final inspection—ensuring a flawless and professional result.
1. Introduction to Aluminum Composite Panels (ACP)
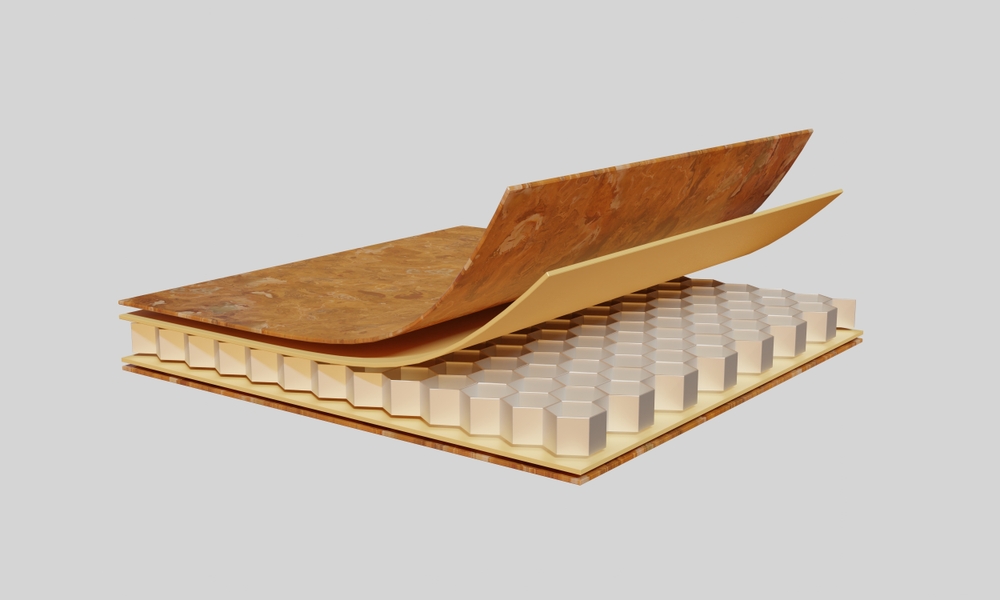
Aluminum Composite Panels (ACP) are lightweight, durable cladding materials made of two aluminum sheets bonded to a non-aluminum core. They are widely used in architectural projects for their superior weather resistance, fire safety, and aesthetic versatility. Proper installation ensures ACPs maintain structural integrity and visual appeal over time.
2. Preparation and Safety Measures
Safety Equipment
Ensure a safe working environment by using appropriate personal protective equipment (PPE):
Gloves to protect hands.
Safety glasses to shield eyes.
Proper footwear to prevent slipping.
Safety harnesses for working at heights.
Respiratory protection if cutting generates dust or fumes.
Site Assessment
Evaluate Wall Condition: Ensure the wall is structurally sound and free from debris.
Check Surface Evenness: The surface should be level with minimal deviations.
Moisture Content: Ensure moisture levels are below 15% to prevent panel degradation.
Document Penetrations: Identify existing openings such as pipes and vents.
Load-Bearing Capacity: Confirm the wall can support the panels’ weight.
Material Storage and Handling
Store panels horizontally on flat surfaces.
Keep them in a temperature-controlled environment (15-25°C).
Avoid direct sunlight and moisture exposure.
Use clean gloves to handle panels and prevent stains.
3. Tools Required for ACP Installation
Tool
Purpose
Power drill and drill bits
Drilling holes and driving fasteners
Circular saw with carbide blade
Cutting ACP panels
Laser level
Ensuring alignment and levelness
Measuring tape and chalk line
Accurate measurements and markings
Rubber mallet
Tapping panels into place without damage
Rivet gun
Securing panels with rivets
Sealant gun
Applying silicone sealant
4. Substructure Installation
Wall Preparation
Clean the Surface: Remove dust, debris, and old paint.
Repair Damage: Fix cracks and structural issues.
Apply Waterproofing Membrane: Ensure the wall is water-resistant.
Mark Reference Lines: Use a chalk line to establish guides for panel placement.
Primary Support System
Install Vertical Brackets: Space them 600-900mm apart, adjusting for wind loads.
Thermal Breaks: Prevent heat transfer by incorporating thermal breaks.
Check Alignment: Ensure brackets are level and plumb.
Secondary Framework
Vertical Tracks: Mount tracks 500-750mm apart for optimal support.
Horizontal Rails: Use where necessary to form a grid system.
5. Panel Installation Process
Panel Preparation
Verify Dimensions: Match panel size with design specifications.
Cut Panels: Use a carbide-tipped circular saw and support the panel during cutting.
Pre-Drill Holes: Maintain the correct edge distance for secure fastening.
Installation Sequence
Starting Point: Begin at a corner or designated datum line.
Base Track Installation: Attach the base track or starter strip.
Mount Panels: Position the first panel using spacers and secure it with fasteners.
Continue Sequentially: Work from bottom to top and left to right.
6. Joint Treatment and Special Considerations
Joint Treatment
Backer Rod Installation: Insert backer rods into joints for added support.
Sealant Application: Apply silicone sealant evenly to create watertight seals.
Tool the Sealant: Smooth the sealant for a clean finish.
Special Considerations Around Openings
Additional Support: Reinforce areas around windows and doors.
Flashings: Install flashings to prevent water infiltration.
7. Quality Control and Final Inspection
Panel Alignment: Check for uniform alignment and levelness.
Sealant Quality: Ensure sealant is properly applied and smooth.
Surface Cleaning: Clean panels thoroughly and remove protective film.
8. Maintenance Recommendations
Task
Frequency
Details
Cleaning
Every 6-12 months
Use mild detergent and soft cloth.
Joint Inspection
Annually
Check for cracks and reseal if needed.
Fastener Check
Annually
Tighten any loose fasteners.
9. Troubleshooting Common Issues
Panel Misalignment
Check Framework Levelness: Ensure substructure is level.
Re-align Panels: Adjust using spacers and fasteners.
Water Infiltration
Sealant Gaps: Inspect and reseal any gaps.
Flashings: Ensure proper flashing installation around openings.
Conclusion: Installing Aluminum Composite Panels requires precision, attention to detail, and adherence to safety protocols. By following this guide, you can achieve a flawless, durable, and aesthetically pleasing ACP installation.